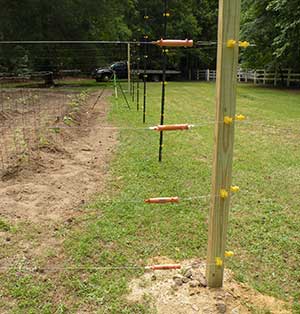
1. Drive 10 foot t-posts along the perimeter of the garden. We spaced the posts 10 feet apart. Place the corners first (read step 2). Run a string from corner to corner to line up the t-posts.
t-posts
Use a level to drive the posts in straight.
Use a measuring tape to drive the posts in the same depth. We used 96 inches for our exposed post height.
post driver
2. If desired, use 4 X 4 (inch) wood posts for the corners to add stability. Place the hole in a 16-18 inch hole. Straighten the post with the level. Pour Quikrete or a similar product to hold the post.
corner post
3. After all the posts are in, place the insulators that will hold the wire. We started the bottom wire 9 inches from the ground and subsequent wires 16 inches apart. Our top wire was approximately 7 feet off the ground. (Remember deer are high jumpers :). )
insulators
gate handles
In the past we have constructed a 4 foot t-post fence and taken it down after the summer garden. This fence has been designed to be permanent so we have allowed for an opening wide enough for a tractor.
One disadvantage of a permanent garden fence is that you can't easily move your garden location if pests get out of control. Moving the garden is an effective pest control method since many garden pests overwinter in the same area.
We have decided to compromise on the insect pest aspect in order to eliminate the deer damage since that has been a huge problem with our vegetable garden. See previous posts about our deer problem.
5. Hook up electric fence to fence charger.We use an electric charger mounted in a small greenhouse near the garden. Alternatively, you can use a solar fence charger mounted in the open.
electric charger
completed fence around garden
Thanks to our dear friends, Mary Pat and Joe, for giving us the t-posts. We appreciate your encouragement and advice on garden fencing.


No comments:
Post a Comment
Please share your professional comments.